RabbitMQ消息队列
- 消息队列的概念
- windows下面安装RabbitMQ
- RabbitMQ的初步使用
- RabbitMQ的几种模式
- springboot整合RabbitMQ
- 关于持久化操作,消息确认(自动和手动),事务管理
消息队列的概念
首先消息队列是应用程序之间的一种通信办法,其次,在应用程序中可以将一些无需及时返回的以及耗时的业务提取出来,通过异步的方式,当然异步的方式主要就是节省了服务器的响应时间,从而提高系统的吞吐量
消息队列的应用场景一般在应用解耦、异步处理(提高系统响应速度)、流量削峰(高峰堆积消息,峰后继续处理消息)、日志处理、通讯上面。
消息队列模型(AMQP和JMS)
AMQP高级消息队列协议,是一个进程间传递异步消息的网络协议,更准确的说是一种binary wire-level protocol(链接协议)。这是其和JMS的本质差别,AMQP不从API层进行限定,而是直接定义网络交换的数据格式.
JMS即Java消息服务(JavaMessage Service)应用程序接口,是一个Java平台中关于面向消息中间件(MOM)的API,用于在两个应用程序之间,或分布式系统中发送消息,进行异步通信。
注意:JMS是定义了统一的接口,来对消息操作进行统一;AMQP是通过规定协议来统一数据交互的格式,JMS限定了必须使用Java语言;AMQP只是协议,不规定实现方式,因此是跨语言的。JMS规定了两种消息模式;而AMQP的消息模式更加丰富,简单的说就好比一个是已经开发好的应用,一个定义了一系列的标准。
关于消息队列的产品
kafka
Apache下的一个子项目,使用scala实现的一个高性能分布式Publish/Subscribe消息队列系统。
- 快速持久化:通过磁盘顺序读写与零拷贝机制,可以在O(1)的系统开销下进行消息持久化
- 高吞吐:在一台普通的服务器上既可以达到10W/s的吞吐速率
- 高堆积:支持topic下消费者较长时间离线,消息堆积量大;
- 完全的分布式系统:Broker、Producer、Consumer都原生自动支持分布式,依赖zookeeper自动实现复杂均衡
rabbitmq
RocketMQ是一款分布式、队列模型的消息中间件,具有以下特点 :
- 能够保证严格的消息顺序,提供丰富的消息拉取模式
- 高效的订阅者水平扩展能力.实时的消息订阅机制
- 支持事务消息,亿级消息堆积能力.
- 生产者不会将消息直接发送给队列,消息在发送给客户端时先在中心队列排队。对路由(Routing),负载均衡(Load balance)、数据持久化都有很好的支持
支持的模式有以下(来源于官网):
windows下面安装RabbitMQ
因为RabbitMQ基于erlang语言,所以首先先安装erlang语言,安装过程主要为
下载并安装erlang语言,配置相应的环境变量。CMD执行
1
erl # 截图如下

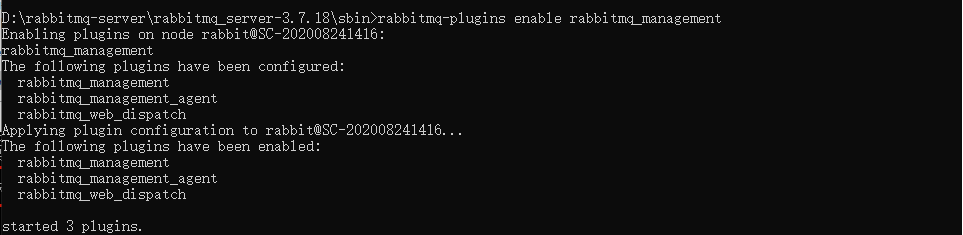
2.下载并安装rabbitmq,然后在sbin目录下执行
1 | rabbitmq-plugins enable rabbitmq_management # 截图如下 |
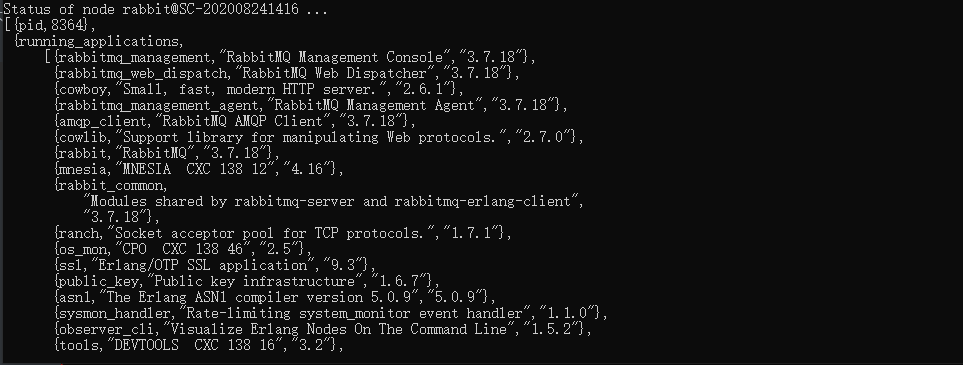
3.在此目录下查看rabbitmq状态
1 | rabbitmqctl status # 截图如下 |
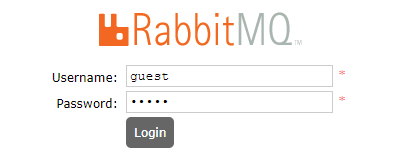
4.输入地址http://localhost:15672/ 默认账户密码guest
关于用户
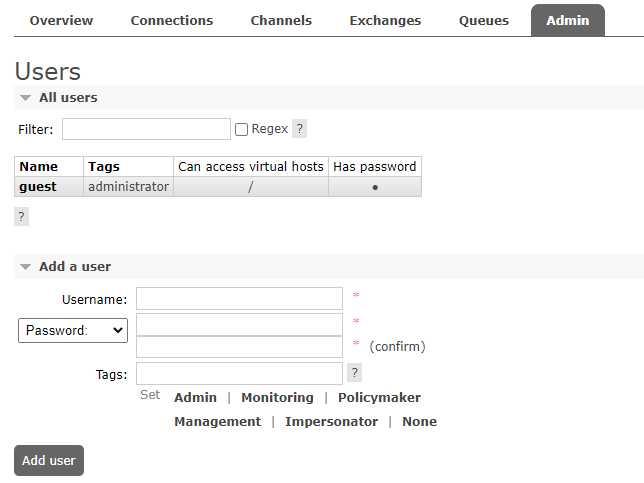
角色说明:
超级管理员(administrator) 可登陆管理控制台,可查看所有的信息,并且可以对用户,策略(policy)进行操作。
监控者(monitoring) 可登陆管理控制台,同时可以查看rabbitmq节点的相关信息(进程数,内存使用情况,磁盘使用情况等)
策略制定者(policymaker)可登陆管理控制台, 同时可以对policy进行管理。但无法查看节点的相关信息(上图红框标识的部分)。
普通管理者(management)仅可登陆管理控制台,无法看到节点信息,也无法对策略进行管理。
关于 Virtual Hosts配置
Virtual Hosts就是虚拟主机的意思.相当于一个独立的数据库,数据库之间不受影响.一般以/开头

当然同理可以不同的用户能访问的虚拟注意不一样
RabbitMQ的初步使用
1.创建一个maven项目,pom.xml文件如下
1 | <project xmlns="http://maven.apache.org/POM/4.0.0" xmlns:xsi="http://www.w3.org/2001/XMLSchema-instance" xsi:schemaLocation="http://maven.apache.org/POM/4.0.0 https://maven.apache.org/xsd/maven-4.0.0.xsd"> |
2.创建生产者和消费者都需要提供一个连接对象。先封装一下
1 | import com.rabbitmq.client.Connection; |
结果如下:

RabbitMQ的几种模式
模式一简单发送消息
生产者:也就是要发送消息的程序.
消费者:消息的接受者,会一直等待消息到来.
消息队列:生产者向其中投递消息,消费者从其中取出消息.
生产者代码如下:
1 | public class P { |
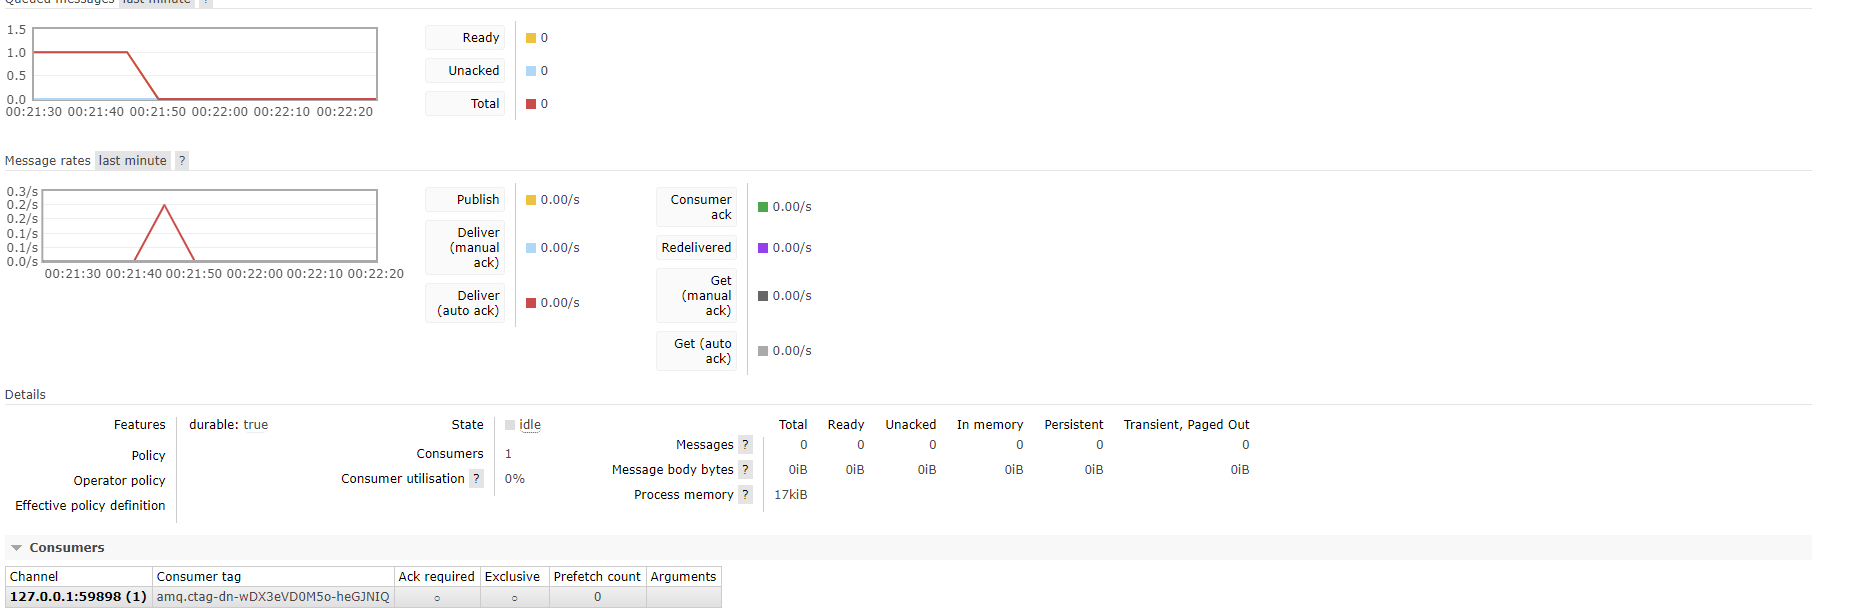
可以看到有一条消息待读

消费者代码如下:
1 |
|

以下可以看到消息在被读取后就删除了,消费者一直挂起中
模式二多个消费者(有竞争关系的)
生产者代码如下:
1 | import com.rabbitmq.client.Channel; |
构建多个消费者,代码一样,参照模式一
先启动消费者,然后启动生产者,观察


相当于10个相同的任务,被雇佣的2个员工分担了
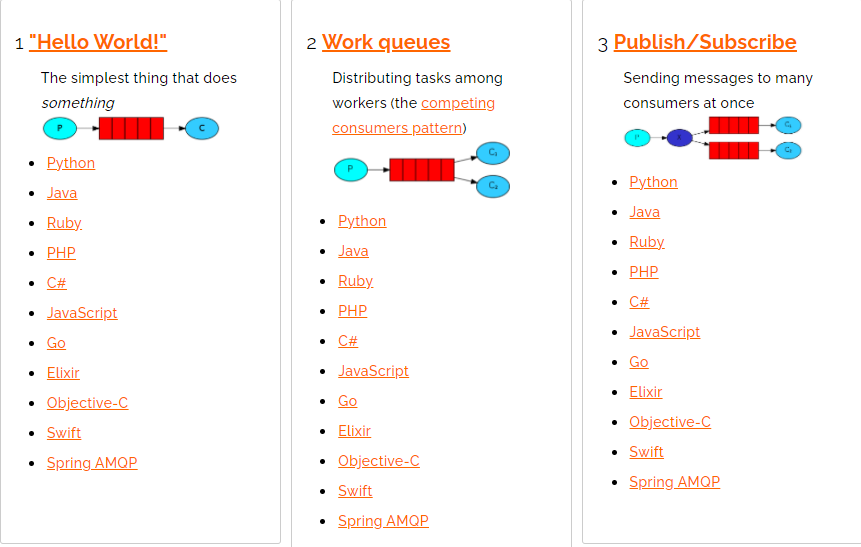
模式三(发布订阅模式)
注意:生产者是通过发布消息是通过交换机传递到队列中
关于交换机的说明
交换机,。一方面,接收生产者发送的消息。另一方面,知道如何处理消息,例如递交给某个特别队列、递交给所有队列、或是将消息丢弃。到底如何操作,取决于Exchange的类型。Exchange有常见以下3种类型:
Fanout:广播,将消息交给所有绑定到交换机的队列
Direct:定向,把消息交给符合指定routing key 的队列
Topic:通配符,把消息交给符合routing pattern(路由模式) 的队列
生产者代码如下:
1 | import com.rabbitmq.client.BuiltinExchangeType; |
消费者代码如下:
1 | import java.io.IOException; |
同样启动消费者,然后观察结果

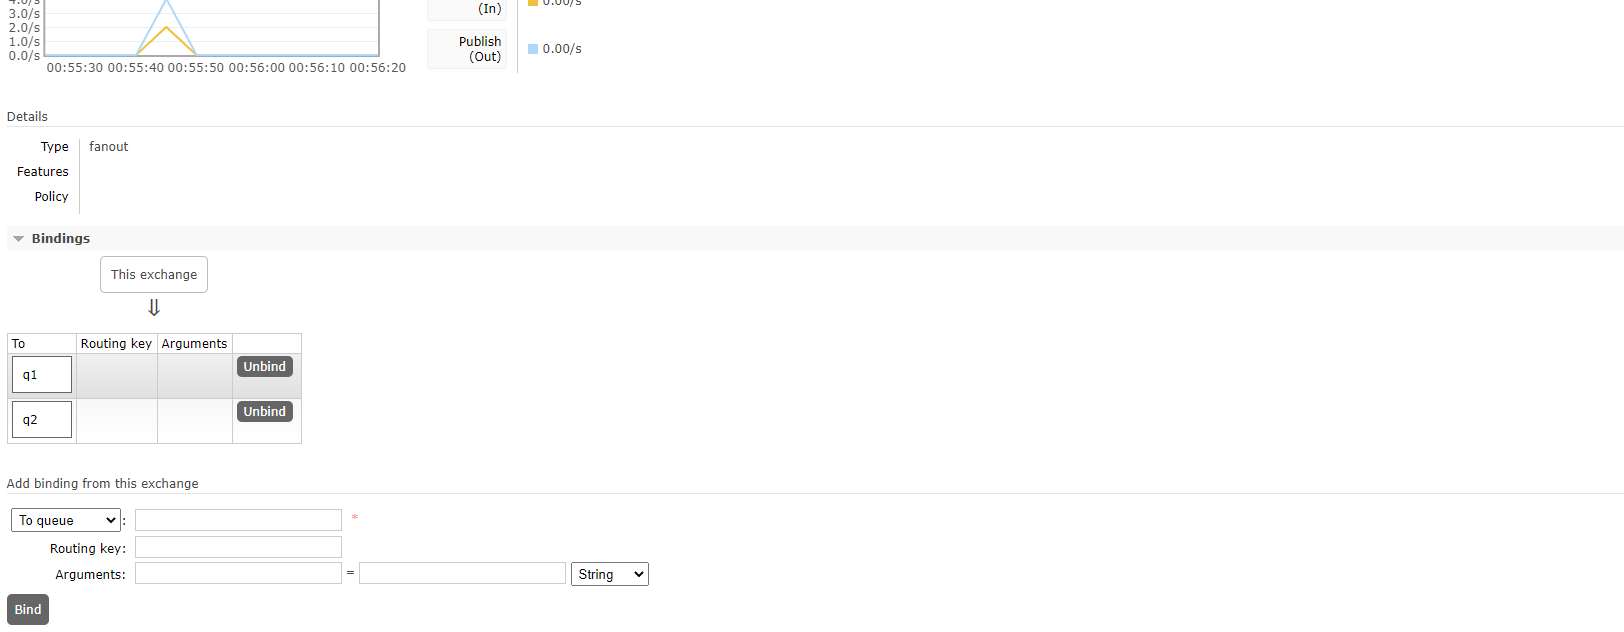
可以看到消费者都消费了10条消息。q1和q2主题绑定在了同一个交换机上面
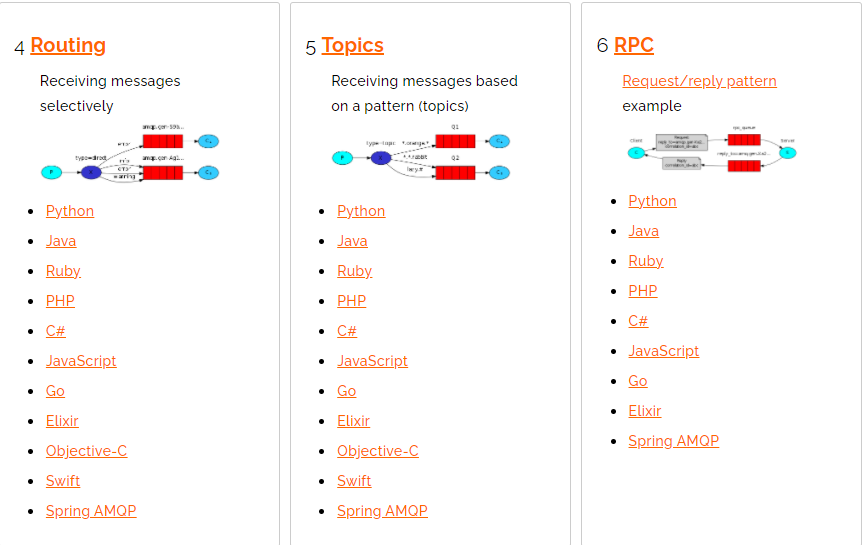
模式四(有选择性的接收)
主要是在exchange交换上加上了路由值。可以将路由值理解为分类值
生产者代码如下:
1 |
|
消费者代码如下:消费者1消费apple 消费者2消费huawei和xiaomi
1 | import com.rabbitmq.client.Channel; |
同样观察结果

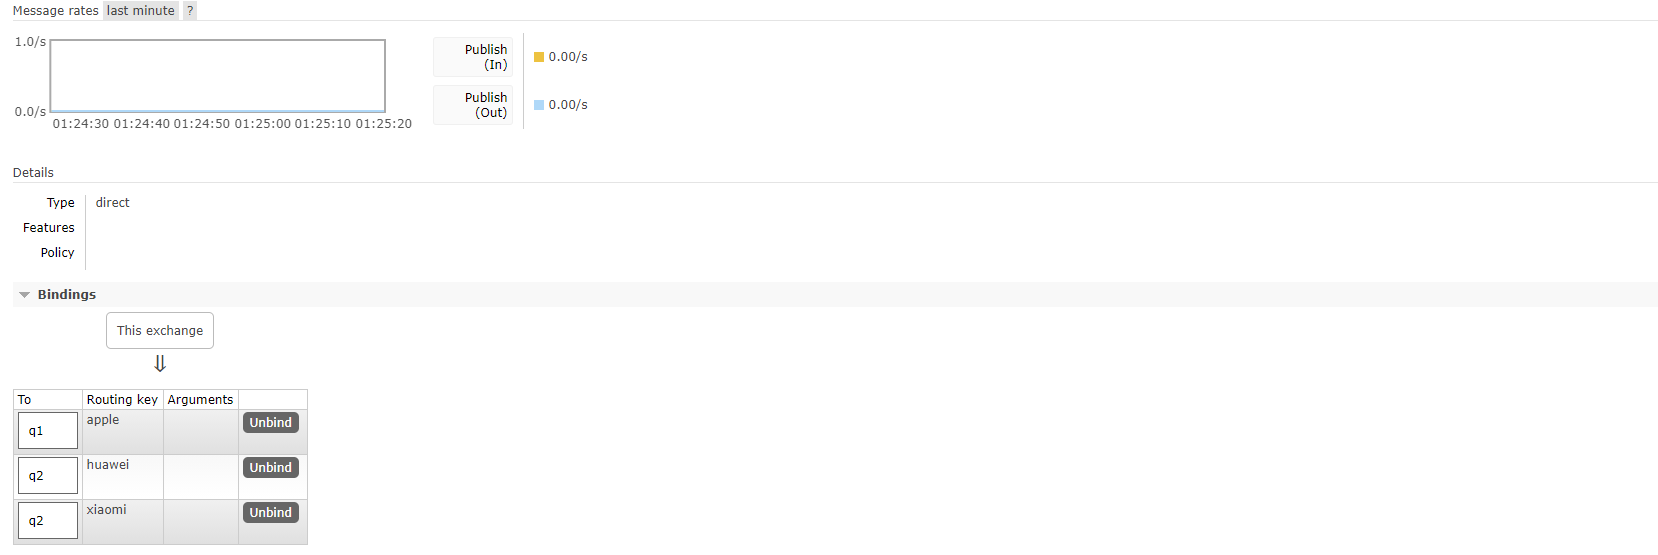
可以不同的类别分发到了不同主题中
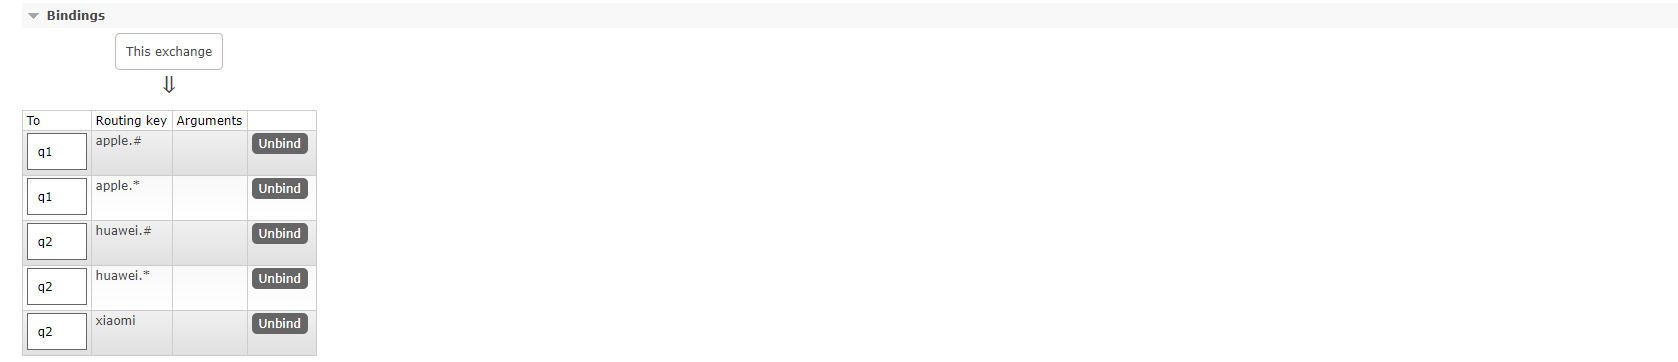
模式伍(基于特定规则的接收)
在模式四的基础上,增加了通配符,也就是类别可以无限细化.因为routingkey 一般都是有一个或多个单词组成,多个单词之间以“ . ”分割
- #:匹配一个或多个词
- *:匹配不多不少恰好1个词
比如item.#:能够匹配item.insert.abc 或者 item.insert,item.*:只能匹配item.insert
生产者代码如下:
1 | import com.rabbitmq.client.BuiltinExchangeType; |
消费者如下:
1 | public class C2 { |
观察结果

Springboot整合RabbitMQ
创建springboot项目
pom.xml如下:
1 | <project xmlns="http://maven.apache.org/POM/4.0.0" |
分别在src/main/java下构建启动程序

1 |
|
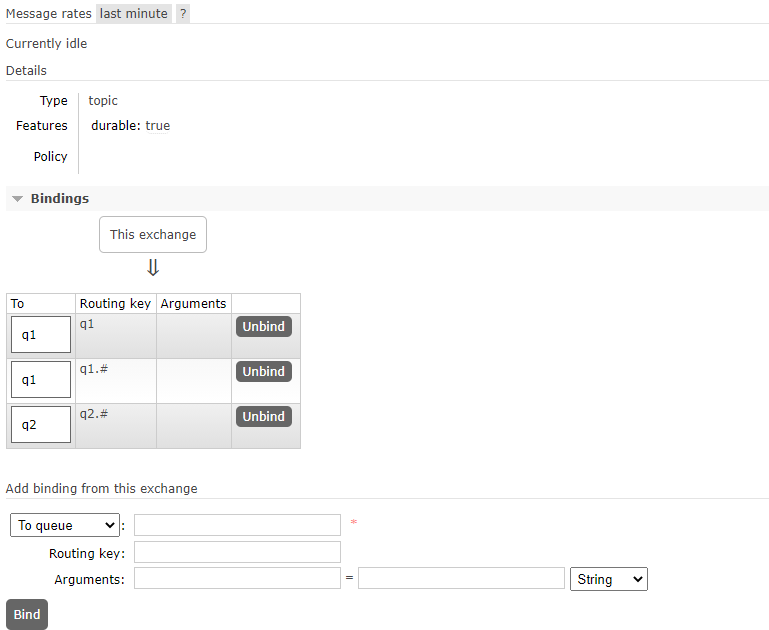
整合RabbitMQ
添加依赖
1 | <dependency> |
修改springboot的配置文件
1 | #rabbitmq连接参数 |
初始化交换机和主题
1 | import org.springframework.amqp.core.Binding; |
构建生产者
1 |
|
构建消费者
1 |
|
最后在启动文件中加入@EnableRabbit
观察如下:
调用send2发送消息
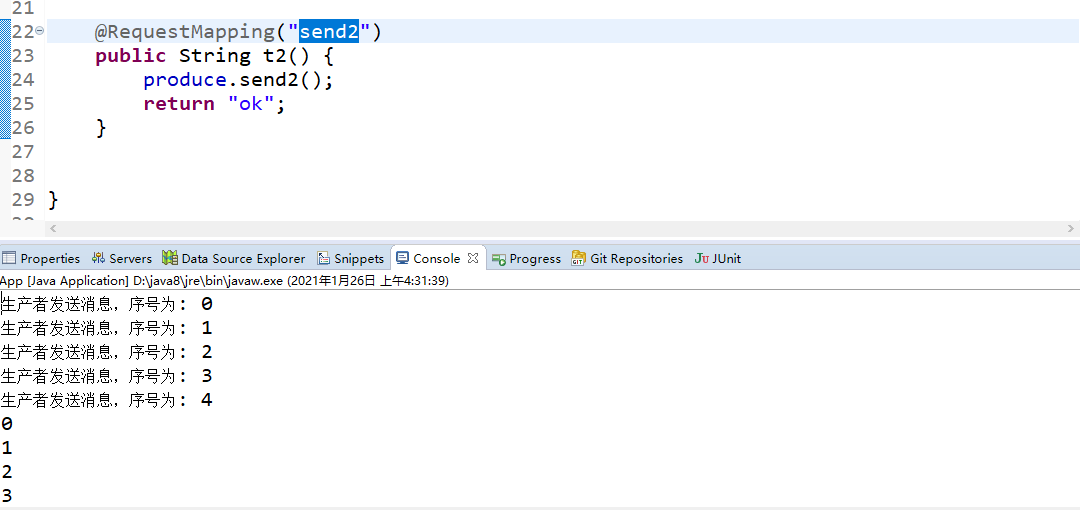
接下来调用send1
关于持久化操作,消息确认(自动和手动),事务管理
- 持久化操作。如果队列与消息不持久化,那么服务在崩溃了之后,消息会丢失。所以可以在构建队列的时候设置durable,以及auto-delete设置为false
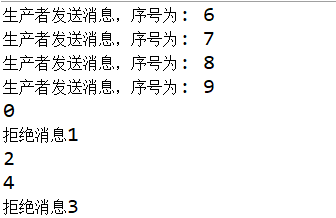
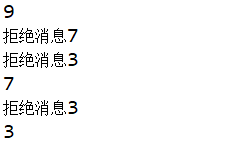
- 消息确认自动和手动:rabbitmq默认确认方式为自动,也就是消息一旦发出立即认为本次投递已经被正确处理,不管消费者端是否成功处理本次投递,那么有可能的情况就是消费者崩掉以后,消息丢失的情况会产生
- 选择手动,通过channel.basicAck 确认 和channel.basicReject 拒绝。一般出现异常的时候,catch异常再拒绝入列
- 事务管理:。生产中不建议使用事务模式,性能比较低,尽量使用手动确认模式