第一步必不可少,理解熟练是必要!
springboot整合kafka发送自定义消息序列
- 结合分层构建的springboot项目,分别构建生产者模块和消费者模块
- 构建自定的数据模型(使用jsonObject进行数据的转换)并配置kafka生产者和消费者
- 使用spring提供的kafka对象编写生产者和消费者代码
- 模拟数据测试代码
- 操作步骤
结合分层构建的springboot项目,分别构建生产者模块和消费者模块
图示:如下
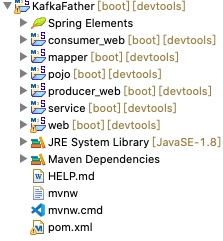
结合分层构建的springboot项目,分别构建生产者模块和消费者模块
父类引入新的依赖文件
1 | <!--kafka依赖配置--> |
在2个模块中构建启动文件以及设置不同的端口和log4j2
1 | //在pom.xml中指定启动文件 |
启动文件示例如下:
1 | @SpringBootApplication |
注意:appliacation.yml文件和log4j2文件请参照前面3-1中配置按需所取
构建自定的数据模型(使用jsonObject进行数据的转换)并配置kafka生产者和消费者
前面提到过,kafka在发送消息的时候需要进行序列化操作,把对象转换字节的,在接收消息的时候需要将字节反序列化成对象,除此之外在kafka中需要按照2个接口进行序列化对象的实现
在pojo模块中构建序列化器以及数据模型
1.模型类
1 | public class Student { |
2.序列化器
1 | public class JsonSerializer implements Serializer<JSONObject>{ |
1 | public class JsonDeserializer implements Deserializer<JSONObject>{ |
3.配置生产者和消费者并引入模型和序列化器(基本配置)
1 | #生产者 |
1 | #消费者 |
使用spring提供的kafka对象编写生产者和消费者代码
生产者代码示例
1 | @Component |
消费者代码示例
1 | @Component |
模拟数据测试代码
1 | @RestController |
操作步骤
- 启动zookeeper
- 启动kafka
- 创建主题(studentMsg)
- 启动消费者
- 启动生产者
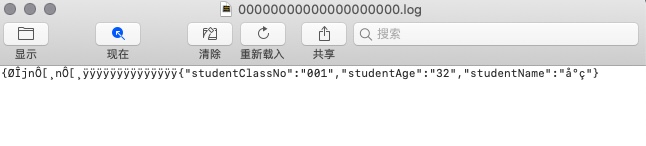
1 | topic = studentMsg, offset = 0, value = {"studentAge":"32","studentClassNo":"001","studentName":"小王"} |
Ok!代码通过测试