开发Kafka_Streams(3-2)

第一步必不可少,理解熟练是必要!

springboot整合kafka发送自定义消息序列

  1. 结合分层构建的springboot项目,分别构建生产者模块和消费者模块
  2. 构建自定的数据模型(使用jsonObject进行数据的转换)并配置kafka生产者和消费者
  3. 使用spring提供的kafka对象编写生产者和消费者代码
  4. 模拟数据测试代码
  5. 操作步骤

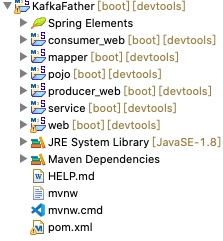
结合分层构建的springboot项目,分别构建生产者模块和消费者模块

图示:如下
IMAGE

结合分层构建的springboot项目,分别构建生产者模块和消费者模块

父类引入新的依赖文件

1
2
3
4
5
6
7
8
9
10
11
12
<!--kafka依赖配置-->
<dependency>
<groupId>org.springframework.kafka</groupId>
<artifactId>spring-kafka</artifactId>
<version>2.3.3.RELEASE</version>
</dependency>
<!--fastjson依赖配置-->
<dependency>
<groupId>com.alibaba</groupId>
<artifactId>fastjson</artifactId>
<version>1.2.4</version>
</dependency>

在2个模块中构建启动文件以及设置不同的端口和log4j2

1
2
3
4
5
6
7
8
9
10
11
12
13
14
15
16
17
18
19
20
21
//在pom.xml中指定启动文件
<build>
<plugins>
<plugin>
<groupId>org.springframework.boot</groupId>
<artifactId>spring-boot-maven-plugin</artifactId>
<configuration>
<!-- 指定该Main Class为全局的唯一入口 -->
<mainClass>com.wwj.producer.WebApplication</mainClass>
<layout>ZIP</layout>
</configuration>
<executions>
<execution>
<goals>
<goal>repackage</goal><!--可以把依赖的包都打包到生成的Jar包中-->
</goals>
</execution>
</executions>
</plugin>
</plugins>
</build>

启动文件示例如下:

1
2
3
4
5
6
7
8
@SpringBootApplication
@ComponentScan(basePackages = "com.wwj")
public class WebApplication {

public static void main(String[] args) {
SpringApplication.run(WebApplication.class);
}
}

注意:appliacation.yml文件和log4j2文件请参照前面3-1中配置按需所取

构建自定的数据模型(使用jsonObject进行数据的转换)并配置kafka生产者和消费者

前面提到过,kafka在发送消息的时候需要进行序列化操作,把对象转换字节的,在接收消息的时候需要将字节反序列化成对象,除此之外在kafka中需要按照2个接口进行序列化对象的实现

在pojo模块中构建序列化器以及数据模型

1.模型类

1
2
3
4
5
public class Student {
private String studentName;
private String studentAge;
private String studentClassNo;
}

2.序列化器

1
2
3
4
5
6
7
8
9
public class JsonSerializer   implements  Serializer<JSONObject>{

@Override
public byte[] serialize(String topic, JSONObject data) {
// TODO Auto-generated method stub
return JSON.toJSONBytes(data);
}

}
1
2
3
4
5
6
7
8
9
public class JsonDeserializer  implements  Deserializer<JSONObject>{

@Override
public JSONObject deserialize(String topic, byte[] data) {
// TODO Auto-generated method stub
return JSON.parseObject(data, JSONObject.class);
}

}

3.配置生产者和消费者并引入模型和序列化器(基本配置)

1
2
3
4
5
6
7
8
#生产者
kafka:
bootstrap-servers: 127.0.0.1:9092
producer:
key-serializer: org.apache.kafka.common.serialization.StringSerializer
value-serializer: com.wwj.util.JsonSerializer
batch-size: 65536
buffer-memory: 524288
1
2
3
4
5
6
7
8
9
#消费者
kafka:
bootstrap-servers: 127.0.0.1:9092
consumer:
group-id: 0
enable-auto-commit: true
auto-commit-interval: 1000
key-deserializer: org.apache.kafka.common.serialization.StringDeserializer
value-deserializer: com.wwj.util.JsonDeserializer

使用spring提供的kafka对象编写生产者和消费者代码

生产者代码示例

1
2
3
4
5
6
7
8
9
10
11
12
13
14
15
16
17
18
19
20
21
22
23
24
25
26
@Component
public class KfkaProducer {

private static final Logger LOG = LogManager.getLogger(KfkaProducer.class);

@Autowired
private KafkaTemplate<String,JSONObject> kafkaTemplate;

public void sendMsg(String topic,JSONObject msg) {
ListenableFuture<SendResult<String, JSONObject>> future = kafkaTemplate.send(topic, msg);
future.addCallback(new SuccessCallback<Object>() {

@Override
public void onSuccess(Object result) {
// TODO Auto-generated method stub
LOG.info("消息发送成功");
}
},new FailureCallback() {

@Override
public void onFailure(Throwable ex) {
LOG.info("消息发送失败");

}
});
}

消费者代码示例

1
2
3
4
5
6
7
8
9
10
@Component
public class KafkaConsumer {
private static final Logger LOG = LogManager.getLogger(KafkaConsumer.class);

@KafkaListener(topics = {"studentMsg"})
public void receiveDate(ConsumerRecord<?, ?> record) {
System.out.printf("topic = %s, offset = %d, value = %s \n", record.topic(), record.offset(), record.value());
}

}

模拟数据测试代码

1
2
3
4
5
6
7
8
9
10
11
12
13
14
15
16
@RestController
public class MockController {

@Autowired
private KfkaProducer producer;

@RequestMapping("mock")
public void sendMock() {
Student student = new Student();
student.setStudentName("小王");
student.setStudentClassNo("001");
student.setStudentAge("32");
producer.sendMsg("studentMsg",(JSONObject)JSONObject.toJSON(student));
}

}

操作步骤

  1. 启动zookeeper
  2. 启动kafka
  3. 创建主题(studentMsg)
  4. 启动消费者
  5. 启动生产者
1
topic = studentMsg, offset = 0, value = {"studentAge":"32","studentClassNo":"001","studentName":"小王"}

IMAGE

Ok!代码通过测试