Spring的核心思想就是IOC和AOP
spring的AOP(面向切面)
- SpringAOP 详解(aop思想,aop利用代理的想法,代理模式.以及Java提供的动态代理和CGLIB库提供的继承性代理)
- SpringAOP 的事务管理(如何使用spring管理事务。事务的传播性)
SpringAop详解
- Aop的核⼼思想叫做⾯向切⾯编程,它是⼀种⾯对横向业务流提出的⼀种解耦⽅案(何为aop,就好⽐法式⾯包.你想加点葡萄,花⽣仁什么的,你不可能因为你想吃什么,⽽重新做.你可以⽤到刀切成⼏块,在每块当中镶嵌进去)
- 可能会有⼈说,这已经改变的物理结构本⾝发⽣的变化,现实当中不好实现,但是软件开发中,我们作为上帝,那可以随时的组装和实现
- 如何实现?从这个例⼦来说,我们可以看到想⾃⼰想加什么就加什么,不想加的时候,又能随时⽅便的去掉.又不承担任何风险.现实当中,我们就要不断的去克隆和复制同⼀块物体,以保证风控程度是接近于0.所以在软件的设计开发当中,就是需要我们考虑的⼀个问题(如何解耦)
- 所以我们需要使⽤⼀种称作为代理的机制.
代理顾名思义便是帮XXX去相关的事,好比彩票你自己买不了,你需要要彩票的代理点帮你买
回过来,我们用专业的计算术语来解释,功能之间是否能够相互独立,能否保证代码不入侵,能达到同样的效果
代码当中体现,能不能尽量在不改动代码的情况下,只以添加类和删减类的插播方式,达到随用随取
代理模式的实现:
- 一共有3个人称出现.代理角色,真实角色,代理角色和抽象角色共同的行为方式。
- 代理角色有真实角色的行为引用
代码示例
1 | /** |
1 | /** |
1 | /** |
1 | public class TestProxy { |
代理模式的深入思考
- 从上面的代码看,可以发现,如果我们想代理其它的真实角色,那么不说我们需要不断的去扩充接口,扩充真实的代理角色
- 是否有一种方式,可以动态的实现真实的角色想要实现的动作(其实就是利用我们的反射机制)
jdk支持的动态代理方式(实现步骤)
- 同样的构造接口和真实的角色
1 | /** |
1 | /** |
2.实现动态代理特征接口
1 | /** |
- 通过接口特征构造动态代理对象
1 | public class TestJdkProxy { |
使用cglib的方式
如果只有类,主要通过对字节码的操作.以继承的方式对原有类进行扩展
- 构建真实角色
1 | public class NewRole { |
- 构建代理拦截器
1 | public class CglibProxy implements MethodInterceptor { |
- 生成代理对象
1 | public static void main(String[] args) { |
spring利用aop机制的实现
名词概念:
- Aspect:切面,由一系列切点、增强和引入组成的模块对象,可定义优先级,从而影响增强和引入的执行顺序
- Join point:接入点,程序执行期的一个点,例如方法执行、类初始化、异常处理(一般用来获取方法中的一些元数据)
- Advice:增强,切面在特定接入点的执行动作,包括 “around,” “before” and “after”等多种类型
- Pointcut:切点,用来匹配特定接入点的谓词(表达式)
- Weaving:织入,将一个或多个切面与类或对象链接在一起创建一个被增强对象(也就是构建代理对象的过程)
通知名词:
- 前置通知 在目标方法执行之前执行执行的通知
- 后置通知 在目标方法执行之后执行的通知 (出现异常便不再调用)
- 环绕通知 在目标方法执行之前和之后都可以执行额外代码的通知。
- 异常通知 在目标方法抛出异常时执行的通知
- 最终通知 是在目标方法执行之后执行的通知。
通知的应用场景:

实现方式:
- 构建真实角色
1 | public class UserServiceImpl implements UserService{ |
- 定义增强类
1 | package com.wwj.springaop; |
- 配置xml 实例化角色 增强类 以及切面,和织入的过程
1 | <?xml version="1.0" encoding="UTF-8"?> |
4.测试执行
1 | public static void main(String[] args) { |
SpringAOP进行事务管理 (如何使用spring管理事务。事务的传播性)
通过上面的例子,我们可以看到即将接触到的事务采用环绕通知的方式为最佳.因为全程都在跟进
何为事务的传播性
- 当服务被定义,就有可能会有事务的产生
- 服务和服务之间相互调用,就会产生我们称作为事务的传播
- 事务的传播存在于多个服务相互调用,要保证遵循满足首次产生事务的的ACID
举例说明
- 转账是一个服务,扣款是一个服务(转账的时候需要调用扣款的服务就构成了)
- 转账的时候,扣款出了问题,就需要回滚到首次事务,来保证事务的完整性
代码说明(未加入事务)
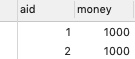
- mysql数据库一张账户表(李四余额1000,张三余额1000) 张三转账给李四1000(动作)
代码示例
- 构建dao层以及接口
1 |
|
- 构建服务接口和接口实现
扣款
1 | /** |
转账
1 | /** |
测试
1 | @Component(value="testTX") |
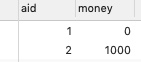
金额变动假定没有出现任何异常的情况
==================>
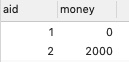
假定扣款出现问题,模拟sql语句执行错误
你会发现,钱扣了,但钱没到账
SpringAOP的事务管理(采用spring进行事务的管理)
- spring管理事务2种方式
- 声明式事务 (全局管理事务 可以采用xml方式 或者是 @Transactional 注解的类级别支持和方法的级别)
- 编程式事务 (spring推荐使用TransactionTemplate)类似在jdbc中开启事务(了解)
一个功能是否要事务,必须纳入设计.编码考虑.不能仅仅完成了基本功能就ok
- spring使用声明式事务
- 基于XML
1 | <?xml version="1.0" encoding="UTF-8"?> |
- 基于注解的方式进行

- 直接在方法或者类上面加:
@Transactional(propagation=Propagation.REQUIRED,isolation=Isolation.REPEATABLE_READ,timeout=-1)
- xml中加入
1 | <!-- 1使用spring事务管理管理数据源操作 --> |