Spring的核心思想就是IOC和AOP
spring路线图(IOC)
- Spring 框架简介(Spring优势2大核心思想的体现 IOC(控制权利反转)以及Aop(面向切面))
- Spring 入门案例(通过操作 看到对象的生成方式发生的不一样)
- Spring 配置文件中 bean 标签详解 (比较重要的单例和多例的配置)
- SpringIOC 讲解 (何为控制反转 为何依赖注入 以及依赖注入实现的几种方式)
- Spring 整合 JDBC (通过引入数据操作,发现接口和实例对象的管理方式发生的变化)(含注解)
Spring框架简介
在未来有很多技术,这里可能需要用,那里可能需要用.我们称作为整合,Spring就来给我们提供整合方案,如何整合这就涉及到我们所说的IOC,当然也有人说spring是一个容器(其实当做插线板更好一些)
spring的产品线
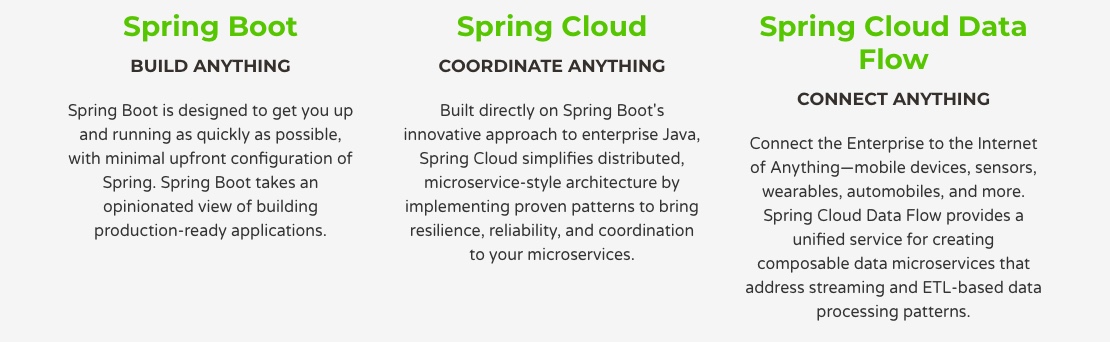
- 快速构建可生产的应用程序,快速使用spring进行项目的集成
- 构建可协调一切的分布式服务应用程序,提供统一的网关.统一的服务治理,统一的可控制面板,统一的数据消息处理
- 构建可统一进行数据清洗的ETL,完善数据仓库信息的,处理任何数据源
注意:最终的目的是为了方便我们把更多的心思放在需求的实现上面(用我们现有的技术体系)
注意:如果转换到使用的角度来说,spring(高度自律的管理者)管理着不同的技术所产生出来的对象
Spring入门案例(观察使用步骤以及对象的生成方式)
1.构建一个web项目,引入对应的jar包
2.构建一个简单的实体
1 | public class User { |
3.构建spring管理的对象的全局文件application.xml
1 | <beans xmlns:xsi="http://www.w3.org/2001/XMLSchema-instance" |
4.测试
1 | public static void main(String[] args) { |
注意1:对象的生成权利交给了谁?谁在管理这个对象?
Spring配置文件中bean标签详解
- name属性代表定义的标记,方便spring查找到需要管理对象的名字
- class 填写管理对象的类型
- 在bean标签中有一个scope属性默认为(singleton),决定了对象是以单例还是多例的方式生成.可以改为prototype.(了解即可)
- 在bean标签中默认对象有一个生命周期(了解) 分别为 init-method 和 destory-method .控制一个对象的生命周期,方便我们更好的管理对象
1 | public static void main(String[] args) { |
SpringIOC 讲解 (何为控制反转 为何依赖注入 以及依赖注入实现的几种方式)
- 先看一下控制正转
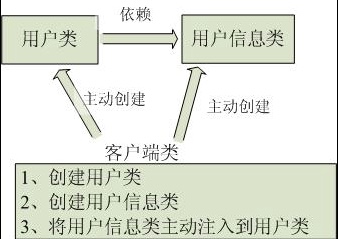
- 在看一下控制反转
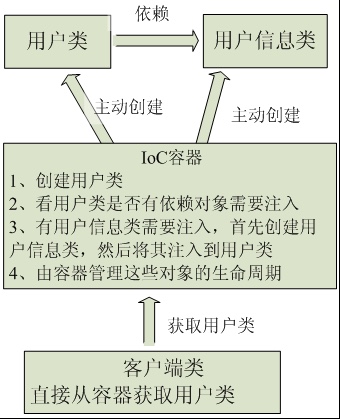
IOC:IOC是一种思想,我们称作为控制反转(也就是权利的移交)
- 依赖注入(对控制反转的进一步升华)(关心对象之间的依赖如何进行管理)
- 谁依赖于谁:当然是应用程序依赖于IoC容器;
- 谁注入谁:很明显是IoC容器注入应用程序某个对象,应用程序依赖的对象
- 注入了什么:就是注入某个对象所需要的外部资源(包括对象、资源、常量数据)
我们可以思考出来spring容器等同于是一个万能的工厂,利用反射机制将对象生成出来,并且进行合理的管控
主要的目的为了解耦.避免代码的入侵
代码示例:假定 小王需要交通工具减轻上班的压力(小王和交通工具就产生了依赖)
1 | public class Person { |
小王富裕了, 要换B打头的车了 如果你改代码就等同于代码入侵,所以我们要抽象出交通工具
1 | public class Person { |
6.使用Spring管理对象的注入的几种方式(关注属性注入即可(最常见)
注入的几种方式(属性注入,构造方法注入,数组,集合,map注入)
代码示例:
1 | public class Vmodel { |
- 对应的配置文件 (我们更多的看到的是ref关联对应的bean)
1 | <!-- 属性注入 --> |
- 测试文件
1 | public static void main(String[] args) { |
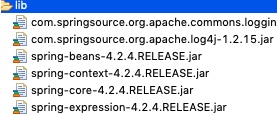
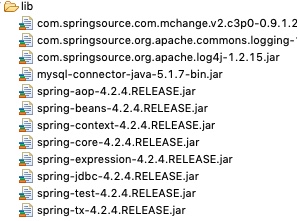
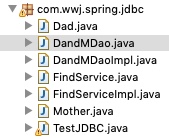
Spring 整合 JDBC(含注解)
- 依赖的jar包
- 类的结构图如下
- 关心下我们的配置文件 application1.xml
1 | <?xml version="1.0" encoding="UTF-8"?> |
有没有发现虽然写起来不麻烦,但总要看看属性名再去填写配置文件
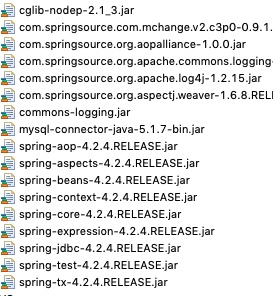
补充说明:使用注解的方式实现
- 依赖的jar包(多了aop)
- 配置文件
1 | <?xml version="1.0" encoding="UTF-8"?> |
注解配置
- dao类
1 | @Repository(value="dandmDao") |
- service类
1 | @Service(value="fs") |
- 测试类
1 | @Component(value="test") |
注解说明1
- @Service用于标注业务层组件(我们通常定义的service层就用这个)
- @Controller用于标注控制层组件
- @Repository用于标注数据访问组件,即DAO组件
- @Component泛指组件,当组件不好归类的时候,我们可以使用这个注解进行标注。
注解说明2
- @Resource、@Autowired
- 当需要在某个类中定义一个属性,并且该属性是一个已存在的bean
- 因为jdbc在读取xml的时候已经加载了
- @Autowired 可以默认使用取的value名字 同时也可以通过加上@Qualifier进行指定